Just recently I had a customer request for a crocheted bracelet with freshwater pearls. Wire crocheting is not something I have done for a wee while so I thought a bit of a 'play' was in order to get me back in the swing. And while I was at it I thought I'd do a quick tutorial, I hope you find it interesting/informative ...
![]() |
| All you need is a crochet hook - here I am using a 2.5mm hook, some wire (28 or 30 gauge is good), some beads eg seed beads, pearls, anything really |
![]() |
| To start, make a loop towards the end of the wire |
![]() |
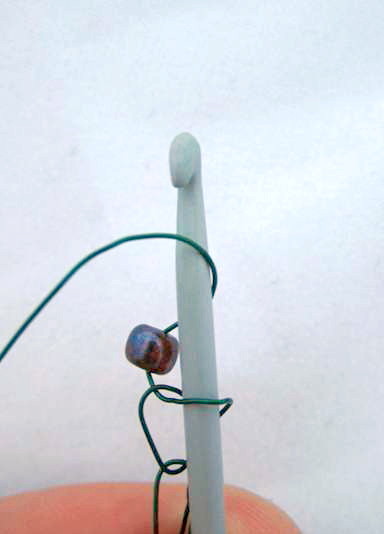
| Bring the top wire behind and partially through the loop making another loop as below |
![]() |
| Tighten a little so it looks like this |
![]() |
| OK, you're ready to chain stitch - your working wire goes behind and around your hook |
![]() |
| Continue while you get a feel for the right tension and even links |
![]() |
| When you are ready, add a workable amount of beads to your working wire |
![]() |
| each bead should be positioned as pictured |
![]() |
| I neglected to picture finishing the chain, but it's easy peasy! Do some beadless links at the end the same as the start of your bracelet, then when you are ready to finish, simply pull the end of your wire around through the loop on your hook and pull to tighten. |
![]() |
| As a simple finish you can crimp a parrot (aka lobster) clasp and split ring to the ends of your wire, and there are so many options for modification - what about combining several strands of crochet - plaiting or twisting them? |
If you have any questions, please feel welcome to ask via a comment on this post or email me at
mel@wildflowerdesigns.co.nz :)
Interesting jewellery fact of the week:
An Opal will cut glass just like a Diamond!!


Lovely :-)
ReplyDeleteYou could also try it with fishing line, because it's a little stretchy and so strong there's no need for a clasp just a well done knot.
True Gill - I can imagine that would look really effective as a necklace :)
ReplyDeleteWow - that's amazing! How wonderful to see your creations take form like this Mel - must have taken ages to do! I ought to do this with binding but it's usually dark when I am stitching - have to sort that one out! The bracelet is gorgeous, will you create more?
ReplyDeleteNo no Louise - it took me less than two minutes. The only time-consuming thing was finding my crochet hooks! And this was just my practice strand - I wasn't going to complete it .. but you've just convinced me I should :). BTW, could you try a daylight bulb in a desk lamp? ,
ReplyDeleteWell, I did not think that you could crochet wire, it looks so effective, cheers Marie
ReplyDeleteA great little tutorial Mel - I was terrible at crocheting when I was younger - the instruction booklets were, (or seemed to be) incredibly complicated and I usually ended up with a tangled ball of yarn in my hands!!:)
ReplyDeleteMany thanks.
Thank you for this. I was searching around for a simple beads on wire crochet tutorial for doing with teens. This is perfect!
ReplyDeleteYou're welcome Lucy - I hope they enjoy trying it and make some fun creations :)
DeleteI was so excited to see your directions! Then there were no pictures for some reason.
ReplyDeleteSounds like something I'd like to try
I love how versatile wire crocheting is and can't wait to try it myself.
ReplyDelete